Category: Uncategorized

  • Educational Insights Design & Drill Gears Workshop: A Guide to Hands-On STEM and Gear-Based Learning

    Educational Insights Design & Drill Gears Workshop: A Guide to Hands-On STEM and Gear-Based Learning

    Introduction

    Young children often learn complicated ideas most naturally when they can touch, move, build, take apart, and experiment with physical objects. Concepts such as cause and effect, rotation, positioning, and mechanical movement can be difficult to explain with words alone, but a hands-on construction activity can turn those ideas into something children can observe directly.

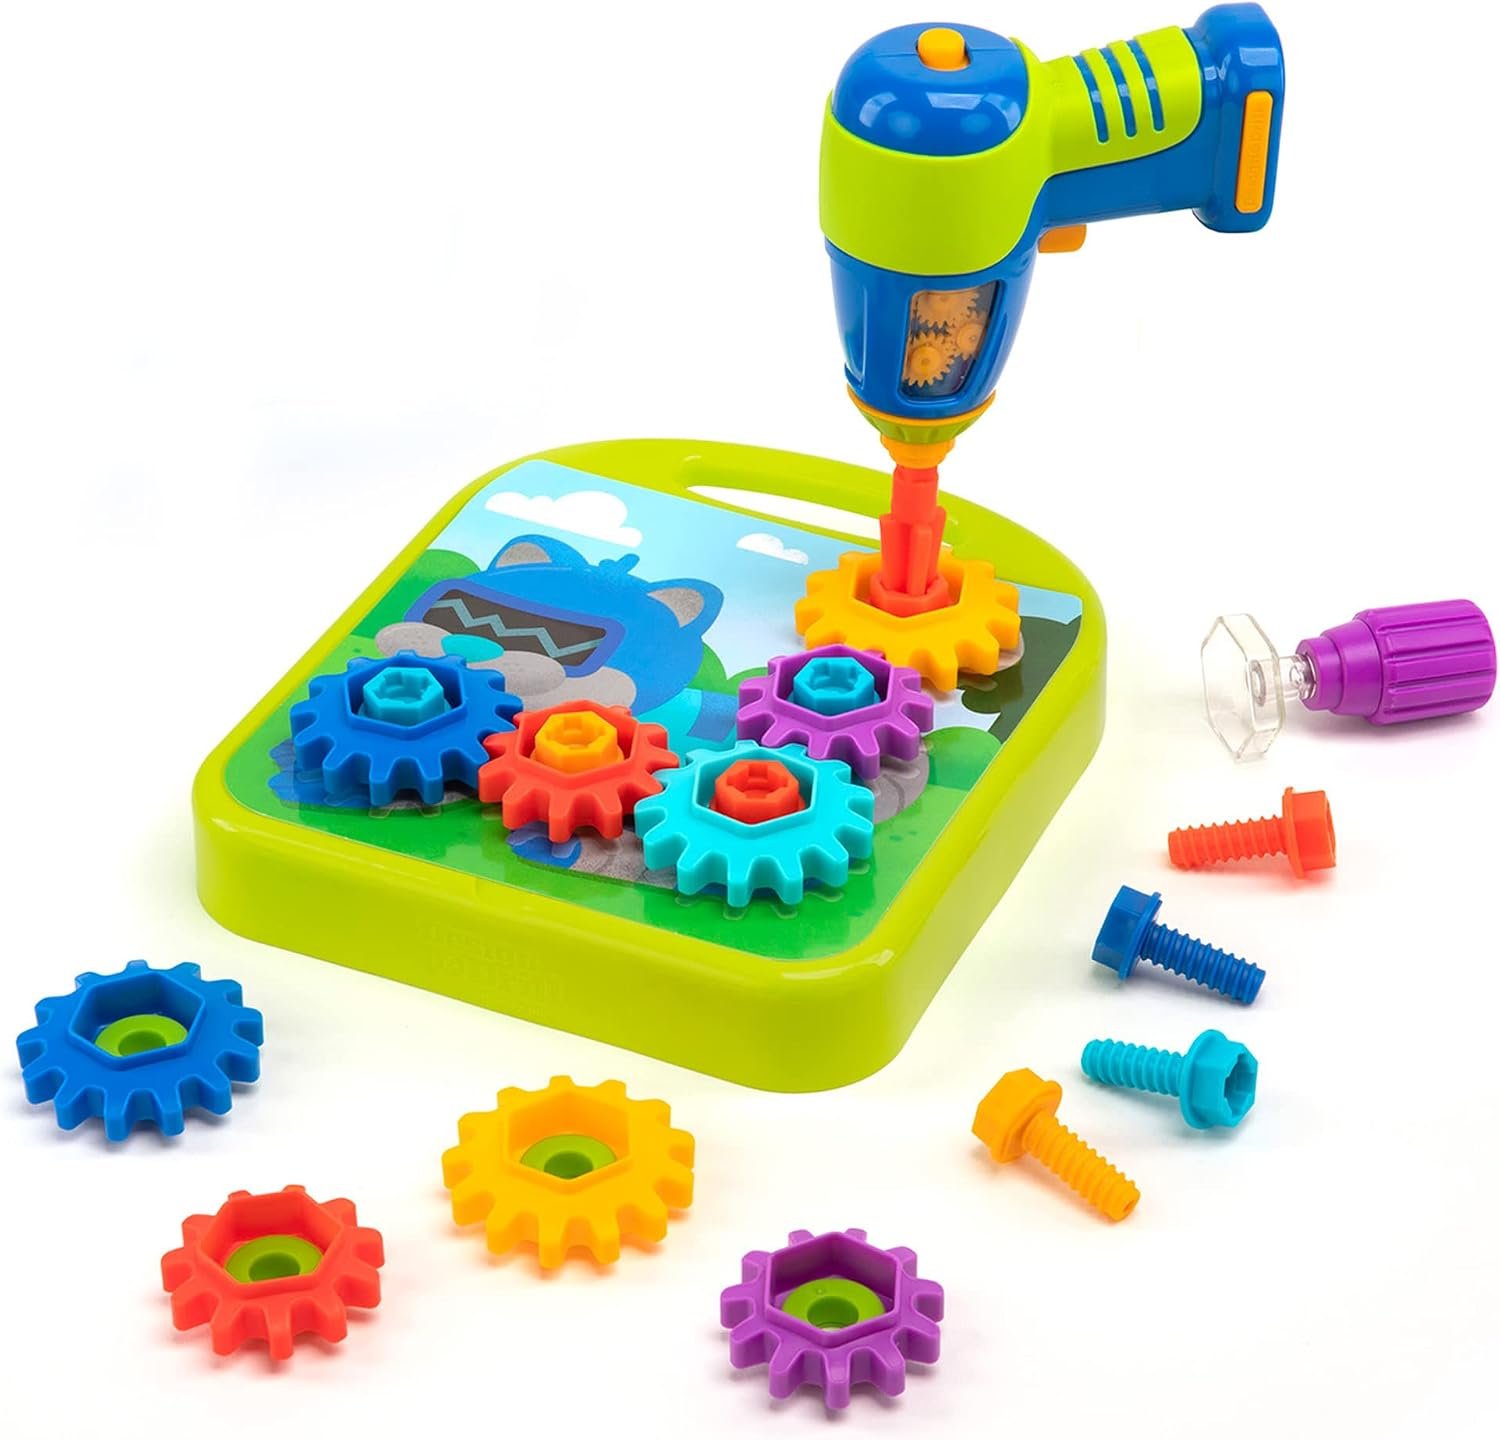
    The Educational Insights Design & Drill Gears Workshop is a preschool-oriented construction and STEM activity centered around gears, bolts, a drilling board, and child-friendly tools. Designed for children ages 3 and up, the set lets children follow visual patterns or create their own arrangements while exploring how interlocking gears transfer movement. Educational Insights describes the activity as an introduction to basic engineering, construction, and cause-and-effect concepts.

    The concept is relatively straightforward. Children place bolts and gears onto a perforated activity board, use a toy drill or manual screwdriver to secure components, and then turn the gears to see how movement can travel from one gear to another. The activity therefore combines construction with experimentation.

    According to Educational Insights, the set includes a kid-friendly electric drill, hand crank, screwdriver, 10 gears in two sizes, 32 bolts, a drilling board, and 10 double-sided pattern cards. The drill requires two AA batteries, which are not included. The manufacturer lists the set as containing 55 pieces and measures the packaged product at approximately 8.6 by 9.1 by 3.7 inches.

    The Gears Workshop can be approached in several ways. A child can begin by following one of the included pattern cards, practice placing bolts and gears in the correct locations, and then move toward creating original arrangements. This gradual transition from guided construction to open-ended experimentation makes the activity suitable for introducing mechanical ideas without requiring children to understand technical engineering terminology.

    This article explores the Design & Drill Gears Workshop in detail, including its components, learning concepts, practical activity ideas, age considerations, safety points, comparisons with other categories of construction toys, and ways caregivers can turn the set into a broader STEM learning experience.

    Key Features of the Design & Drill Gears Workshop

    A Hands-On Gear Construction Activity

    The central idea behind the Gears Workshop is the creation of simple gear systems.

    Children are not simply looking at a finished model. They physically place components, secure them, turn them, and observe the result.

    This creates several opportunities for active learning:

    • Identifying individual components
    • Matching pieces to visual patterns
    • Positioning gears correctly
    • Tightening bolts
    • Operating a child-friendly drill
    • Turning gears manually
    • Observing movement
    • Changing an arrangement
    • Testing what happens
    • Creating original designs

    Educational Insights positions the set as a construction toy that introduces basic engineering and cause-and-effect principles through play.

    Kid-Friendly Electric Drill

    One of the most distinctive parts of the set is the electric toy drill.

    The drill allows children to tighten bolts onto the activity board rather than relying exclusively on a manual screwdriver. Educational Insights describes the tool as a kid-friendly drill designed for the Design & Drill system.

    Using a tool introduces a different type of interaction from simply snapping construction pieces together.

    The child needs to:

    1. Hold the drill.
    2. Position it correctly.
    3. Align it with the bolt.
    4. Activate the drill.
    5. Observe the bolt moving into position.
    6. Stop when the component is secured.

    That sequence requires coordination between visual information and hand movement.

    The drill is therefore not merely decorative. It is part of the construction activity itself.

    Manual Screwdriver

    The set also includes a screwdriver.

    This provides an alternative to the electric drill and allows children to explore the same construction task using a manual tool.

    The difference between the two tools can become an interesting learning opportunity.

    A caregiver can ask:

    “Which one moves by itself?”

    “Which one do you have to turn?”

    “Do they both tighten the bolt?”

    These questions encourage children to notice differences in mechanical operation.

    The manual screwdriver can also be useful when the goal is slower, more deliberate construction.

    Hand Crank

    The hand crank provides another way to interact with the gears.

    Instead of relying on the electric drill for movement, children can manually turn the system and observe how one gear affects another.

    This is particularly useful when introducing cause and effect.

    A child can turn one gear slowly and watch another gear rotate. Then the child can change the arrangement and see whether the result changes.

    The hand crank therefore turns the gear system into a simple mechanical experiment.

    Gears in Two Sizes

    Educational Insights lists 10 gears in two sizes as part of the set.

    Having different gear sizes provides opportunities to compare components.

    Children can explore questions such as:

    • Which gear is larger?
    • Which gear is smaller?
    • How many teeth does each gear have?
    • Can two gears fit together?
    • What happens when gears of different sizes interact?
    • Which direction does the second gear turn?

    These observations introduce early mechanical concepts without requiring formal mathematical calculations.

    32 Colorful Bolts

    The set includes 32 bolts that secure the components to the activity board.

    The bolts serve both a functional and developmental purpose.

    Functionally, they hold the gears and other components in position.

    From a learning perspective, picking up, positioning, and tightening the bolts requires controlled hand movements.

    The different colors can also be incorporated into activities involving color recognition, sorting, pattern creation, and counting.

    For example, a caregiver might ask a child to find all the blue bolts or create a pattern using two colors.

    Drilling Board

    The drilling board provides the structured surface where the child builds the designs.

    Its perforated layout gives children predetermined locations for placing bolts and gears.

    This structure is important because it makes the construction process manageable for young children. Instead of having to invent a mechanical system entirely from scratch, they can begin with a board that already provides possible attachment points.

    The board also allows designs to be dismantled and rebuilt.

    Ten Double-Sided Pattern Cards

    The set includes 10 double-sided pattern cards, providing multiple visual designs to recreate. Educational Insights identifies the cards as part of the 55-piece set.

    Pattern cards can be useful for introducing the activity because they provide a clear objective.

    Instead of asking a young child to design a gear system without guidance, a caregiver can begin with:

    “Let’s make this picture.”

    The child then studies the card, identifies the required components, and works toward reproducing the arrangement.

    Once the child becomes familiar with the process, the cards can serve as inspiration rather than strict instructions.

    Understanding the Learning Concepts

    Cause and Effect

    One of the clearest concepts demonstrated by the Gears Workshop is cause and effect.

    A child turns one gear, and another gear moves.

    That relationship is immediately visible.

    For a young learner, this can be more meaningful than simply hearing an explanation of mechanical transfer.

    The caregiver can make the observation explicit:

    “When you turn this gear, what happens to that one?”

    Then the child can experiment with different arrangements.

    Early Engineering Concepts

    The set provides an introductory way to explore basic mechanical relationships.

    Children can discover that components need to be positioned correctly for a system to work.

    If two gears are too far apart, they may not interact.

    If they are positioned correctly, movement can transfer from one to another.

    This is an early version of engineering thinking: identify a goal, construct something, test it, observe the result, and make adjustments.

    Fine Motor Development

    Fine motor skills involve controlled movements of the hands and fingers.

    The Gears Workshop requires children to manipulate relatively small components, position bolts, hold tools, and rotate mechanisms.

    Educational Insights specifically identifies fine motor development as one of the skills supported by the Design & Drill line.

    These activities involve movements that are different from simply holding a large toy.

    The child has to coordinate fingers and hands with visual information from the board.

    Hand-Eye Coordination

    Hand-eye coordination is relevant throughout the construction process.

    A child needs to look at the location of a hole and place a bolt accurately. The child then needs to position the drill or screwdriver over the bolt.

    Similarly, gears need to be positioned where they can interact.

    The activity therefore combines visual planning with physical execution.

    Problem-Solving

    Not every arrangement will work immediately.

    That is part of the learning process.

    A child may place a gear incorrectly and discover that it does not turn. Instead of simply correcting the mistake for them, a caregiver can ask:

    “What do you think we should change?”

    The child can then move the gear, test the new position, and observe the difference.

    This creates a basic problem-solving loop:

    Try → Observe → Adjust → Try again.

    Spatial Reasoning

    The activity also involves understanding where objects fit relative to one another.

    Children need to consider position, direction, distance, and orientation.

    A gear that works in one location may not work in another.

    These observations can help introduce spatial vocabulary such as:

    • Next to
    • Between
    • Above
    • Below
    • Close
    • Far
    • Inside
    • Outside
    • Left
    • Right

    How the Design & Drill Gears Workshop Can Be Used

    Starting With Pattern Cards

    For a first activity, choose one of the included pattern cards.

    Place it where the child can clearly see it and identify the required pieces.

    Rather than completing the entire design for the child, divide it into smaller steps.

    For example:

    1. Identify the first group of bolts.
    2. Place them on the board.
    3. Secure them.
    4. Add the first gear.
    5. Add the next gear.
    6. Check whether the gears connect.
    7. Test the finished arrangement.

    This approach makes a complex-looking design easier to understand.

    Creating a Simple Gear Chain

    After children become familiar with the pieces, encourage them to create a basic chain of interlocking gears.

    Start with two gears.

    Ask the child to turn one.

    Then introduce a third.

    Ask:

    “What happens now?”

    Adding one gear at a time helps children see how each new component changes the system.

    Exploring Direction

    Gears provide an opportunity to discuss direction.

    When one gear turns clockwise, the adjacent gear generally turns in the opposite direction.

    Young children do not need to memorize those technical terms immediately.

    A simpler activity is:

    “Turn this one to the right. Which way does the next one turn?”

    Then reverse the movement.

    This can turn mechanical play into an early lesson in observation.

    Comparing Gear Sizes

    Use the two gear sizes to introduce comparison.

    Place a larger gear beside a smaller gear and ask:

    “Which one is bigger?”

    Then connect them and turn one.

    The caregiver can encourage the child to notice whether the gears appear to rotate at different rates.

    The goal at this age does not need to be a formal lesson about gear ratios. Observation is enough.

    Creating Color Patterns

    The bolts and gears provide opportunities for simple color activities.

    A child could create:

    • Red-blue-red-blue patterns
    • Groups of one color
    • Rainbow arrangements
    • Symmetrical color designs

    This adds an early mathematics component to the construction activity.

    Counting Bolts and Gears

    Counting can also be integrated naturally.

    Instead of asking a child to count objects from a worksheet, ask them to count the pieces they need.

    For example:

    “How many bolts do we need?”

    “How many gears are on the board?”

    “How many blue bolts did you use?”

    This makes counting part of a practical activity.

    Designing Without a Pattern

    Open-ended construction can be introduced once the child understands the basic system.

    Instead of providing a target design, say:

    “Can you make your own gear machine?”

    There does not need to be one correct answer.

    The child can experiment with different arrangements and see which ones create movement.

    This type of activity can encourage creativity while retaining the mechanical focus of the toy.

    Who the Design & Drill Gears Workshop May Be Suitable For

    Preschool Children

    Educational Insights recommends the Gears Workshop for ages 3 and up.

    Its large construction components, visual cards, and simplified tools are designed around preschool-level interaction.

    Children within the recommended age range may approach the activity differently depending on their previous experience with construction toys.

    Children Interested in Building

    Children who naturally enjoy assembling objects, taking things apart, and experimenting with moving parts may find this type of activity particularly relevant.

    The gear mechanism gives construction an immediate purpose: the pieces are not only being arranged; they are being used to create movement.

    Early STEM Learning

    The product fits naturally into early STEM activities.

    It can be used to introduce:

    • Mechanical movement
    • Cause and effect
    • Simple machines
    • Engineering design
    • Observation
    • Problem-solving
    • Spatial relationships

    These concepts can be explored informally through play.

    Homeschool and Home Learning

    Parents who incorporate hands-on activities into home learning can use the set as a physical STEM station.

    A short session could involve one pattern card followed by an open-ended design challenge.

    The activity can therefore be incorporated without turning play into a formal classroom lesson.

    Preschool Classrooms

    The Gears Workshop can also fit into supervised classroom activity stations.

    The components can be used for small-group construction, rotating stations, or teacher-guided demonstrations.

    Because the set contains small parts, classroom use should include appropriate supervision and storage procedures.

    Important Things to Consider

    The Product Contains Small Parts

    Educational Insights explicitly identifies the Gears Workshop as a choking hazard because it contains small parts and states that it is not intended for children under 3 years.

    This is an important consideration for households with younger siblings.

    The components should be stored where children under the recommended age cannot access them, particularly when the set is not being used.

    Pets should also be prevented from accessing small components.

    Adult Supervision Is Appropriate

    Although the set is designed for children, supervision can be valuable, especially during initial use.

    Adults can help children understand how the tools work, keep pieces organized, and ensure that components are being used appropriately.

    Supervision is particularly relevant around younger siblings and shared play spaces.

    Batteries Are Not Included

    The electric drill requires two AA batteries, and Educational Insights states that batteries are not included.

    Families should therefore check the battery compartment and manufacturer instructions before use.

    Battery installation and replacement should be handled appropriately by an adult, particularly when the toy is being used by young children.

    The Drill Is a Toy Tool

    The electric drill is designed as a children’s toy and should be used only with the components intended for the Design & Drill system.

    It should not be used as an actual household power tool or applied to real construction materials.

    Children should understand that the toy drill is part of the play system rather than a substitute for an adult’s tools.

    Components Can Be Misplaced

    The set contains numerous individual bolts, gears, cards, and tools.

    Small pieces can easily become separated from the main set.

    A storage routine can help.

    For example, all components can be returned to the original container or a dedicated storage box after play.

    Keeping pieces organized also makes the next activity easier to begin.

    Pattern Cards and Free Play Serve Different Purposes

    Pattern cards provide structure, while free play provides more creative freedom.

    A child who struggles with open-ended construction may benefit from beginning with the cards.

    A child who already understands the basic mechanics may prefer to design independently.

    There is no need to use the cards in every session.

    Comparison With General Construction Toy Categories

    Gear Construction Set vs. Traditional Building Blocks

    Traditional building blocks emphasize stacking, balancing, shape, and structural construction.

    The Gears Workshop introduces an additional mechanical element.

    Instead of simply constructing a stationary object, children can create systems where one component affects another.

    Both categories can support spatial reasoning, but the type of problem-solving involved can be different.

    Gear Construction Set vs. Standard Construction Kits

    Many construction kits rely on connectors, pegs, screws, or interlocking pieces.

    The Gears Workshop places particular emphasis on rotational movement.

    This gives children an opportunity to explore how components interact dynamically.

    The addition of the drill also gives the construction process a tool-based component.

    Gear Workshop vs. Pretend-Play Tool Sets

    Pretend tool sets often focus on role-playing activities such as pretending to repair a vehicle, build a house, or work in a workshop.

    The Gears Workshop includes some elements of that experience but connects them to a functional construction system.

    The child actually uses the toy drill to secure bolts and then observes the mechanical result of the completed arrangement.

    Gear Workshop vs. Electronic STEM Toys

    Electronic STEM toys can introduce programming, robotics, lights, sounds, or digital problem-solving.

    The Gears Workshop takes a more physical approach.

    There is no need for a screen or programming interface to observe the mechanical relationship between the gears.

    This makes the activity particularly focused on tangible construction and physical cause and effect.

    Gear Workshop vs. Simple Puzzle Activities

    Puzzles generally involve matching pieces to form a predetermined result.

    Pattern cards in the Gears Workshop share some of that visual-matching element, but the completed arrangement can also move.

    Children therefore work with both visual information and mechanical function.

    Ideas for Caregivers to Extend the Activity

    Ask “What If?” Questions

    Open-ended questions can turn construction into experimentation.

    Try questions such as:

    “What happens if we add another gear?”

    “What happens if we remove this one?”

    “Can you make all the gears move?”

    “Which gear should we turn?”

    “What happens when the gears are too far apart?”

    These questions encourage children to test ideas instead of simply following instructions.

    Introduce Basic Engineering Vocabulary

    Children can gradually become familiar with words such as:

    • Gear
    • Bolt
    • Rotate
    • Turn
    • Move
    • Connect
    • Build
    • Design
    • Test
    • Change
    • Fix
    • Fast
    • Slow

    Using the words during play helps connect language with physical actions.

    Create Small Challenges

    Instead of asking children to build something completely from scratch, give them manageable challenges.

    For example:

    “Can you make three gears move?”

    “Can you use both gear sizes?”

    “Can you make a red and blue pattern?”

    “Can you build a design with five bolts?”

    Each challenge focuses attention on a specific concept.

    Encourage Prediction Before Testing

    Prediction is an important part of scientific thinking.

    Before turning the gear system, ask:

    “Which way do you think this gear will turn?”

    Then let the child test the prediction.

    The result does not need to be correct for the activity to be useful. The comparison between prediction and observation is the learning opportunity.

    Cleaning, Storage, and Maintenance

    Because the set contains numerous components, keeping the pieces organized is an important part of maintaining it.

    After each activity, caregivers can encourage children to:

    1. Remove the gears.
    2. Remove the bolts.
    3. Return the screwdriver.
    4. Store the drill safely.
    5. Collect the pattern cards.
    6. Check the play area for missing pieces.

    The electronic drill should be kept away from liquids and should not be treated like a washable plastic construction component.

    Battery condition should also be monitored.

    If the toy is not going to be used for an extended period, adults may want to follow the manufacturer’s battery-storage recommendations.

    The activity cards should be stored flat or in a way that reduces unnecessary bending.

    Frequently Asked Questions

    What age is the Design & Drill Gears Workshop designed for?

    Educational Insights lists the Gears Workshop for children ages 3 and up.

    What is included in the set?

    The set includes a kid-friendly electric drill, hand crank, screwdriver, 10 gears in two sizes, 32 bolts, a drilling board, and 10 double-sided pattern cards. Educational Insights lists the set as containing 55 pieces.

    Does the electric drill require batteries?

    Yes. The electric drill requires two AA batteries, and the batteries are not included.

    What does the child do with the gears?

    Children place the gears onto the activity board, secure components with bolts, and then turn the gears to observe how interconnected pieces move.

    Does the set teach engineering?

    Educational Insights describes the Gears Workshop as an introduction to basic engineering, construction, and cause-and-effect concepts.

    It should be viewed as an early, play-based introduction rather than a formal engineering curriculum.

    Can children create their own designs?

    Yes. The set can be used with the included pattern cards or for open-ended designs. Educational Insights specifically describes the ability to create custom designs.

    Are the gears different sizes?

    Yes. The set includes 10 gears in two sizes.

    What are the bolts used for?

    The bolts secure components to the drilling board and form part of the construction process. They can also be incorporated into activities involving counting, color recognition, and pattern creation.

    Is the electric drill a real power tool?

    No. It is a child-oriented toy drill designed for use with the Design & Drill system. It should not be used as an actual power tool or for household construction.

    Can the manual screwdriver be used instead of the electric drill?

    The set includes a screwdriver, giving children a manual alternative for working with the bolts. This can be useful when practicing tool manipulation without using the battery-powered function.

    What is the purpose of the hand crank?

    The hand crank allows children to interact with the gear mechanism manually and observe how movement travels through connected gears.

    Does the set contain small parts?

    Yes. Educational Insights explicitly warns that the product contains small parts and identifies it as a choking hazard for children under 3 years.

    Is adult supervision recommended?

    Young children should be appropriately supervised, particularly because of the small components and the use of an electronic toy tool.

    How many pattern cards are included?

    The set includes 10 double-sided pattern cards.

    What are the dimensions of the product?

    Educational Insights lists the product dimensions at approximately 8.6 inches long, 9.1 inches wide, and 3.7 inches high.

    Can the Gears Workshop be used without the pattern cards?

    Yes. The cards provide visual guidance, but children can also create their own gear arrangements and designs.

    Does the toy require a screen or app?

    The manufacturer’s listed set consists of physical components, tools, gears, bolts, a board, and activity cards. The learning activity is therefore centered on hands-on construction rather than a screen-based interface.

    What skills can children practice with this activity?

    Educational Insights identifies early STEM learning, fine motor development, problem-solving, creativity, and spatial reasoning as areas supported by the Design & Drill Gears Workshop and its broader Design & Drill line.

    How can parents make the activity more educational?

    Parents can ask prediction questions, introduce simple mechanical vocabulary, encourage children to explain their designs, and connect the gear activity to real-world examples such as bicycles, clocks, machines, or other systems that use rotating components.

    Conclusion

    The Educational Insights Design & Drill Gears Workshop provides a physical approach to early STEM learning by combining construction, toy tools, gears, bolts, pattern cards, and mechanical movement. Designed for children ages 3 and up, it gives young builders a way to explore concepts such as cause and effect, rotation, positioning, problem-solving, and fine motor coordination through hands-on activity.

    The combination of an electric toy drill, manual screwdriver, hand crank, gears in two sizes, and 32 bolts gives the activity several layers. Children can begin by following one of the included double-sided pattern cards and gradually move toward creating their own arrangements.

    One particularly useful aspect of gear-based construction is that children can immediately observe whether their arrangement works. If two gears connect correctly, movement transfers between them. If they are positioned incorrectly, the system may not behave as expected. That creates a natural opportunity to experiment, make predictions, identify problems, and try again.

    The activity can also be extended beyond mechanical concepts. The colorful bolts and gears can support counting, color recognition, pattern creation, and vocabulary development. Caregivers can turn individual building sessions into broader conversations about movement, machines, design, and everyday objects.

    At the same time, the recommended age and safety information should be taken seriously. The set contains small parts and is not intended for children under 3 years. The electronic drill requires two AA batteries, which are not included, and the toy should be used as a children’s construction tool rather than as a substitute for a real power tool.

    For families, educators, and caregivers looking for a hands-on construction activity centered on gears and basic mechanical ideas, the Gears Workshop offers a structured starting point while leaving room for open-ended experimentation.

    You can check more details on Amazon here.

    As an Amazon Associate, we earn from qualifying purchases.
  • Jackson Safety 370 Speed Dial Replacement Headgear: Features, Fit, Compatibility, and Practical Use

    Jackson Safety 370 Speed Dial Replacement Headgear: Features, Fit, Compatibility, and Practical Use

    Introduction

    A welding helmet is only as practical as the suspension system that holds it in the correct position. The outer shell and viewing lens receive much of the attention when people discuss welding protection, but the headgear inside the helmet plays an important role in how the helmet sits on the user’s head, how easily it can be adjusted, and how consistently the viewing area stays positioned during work.

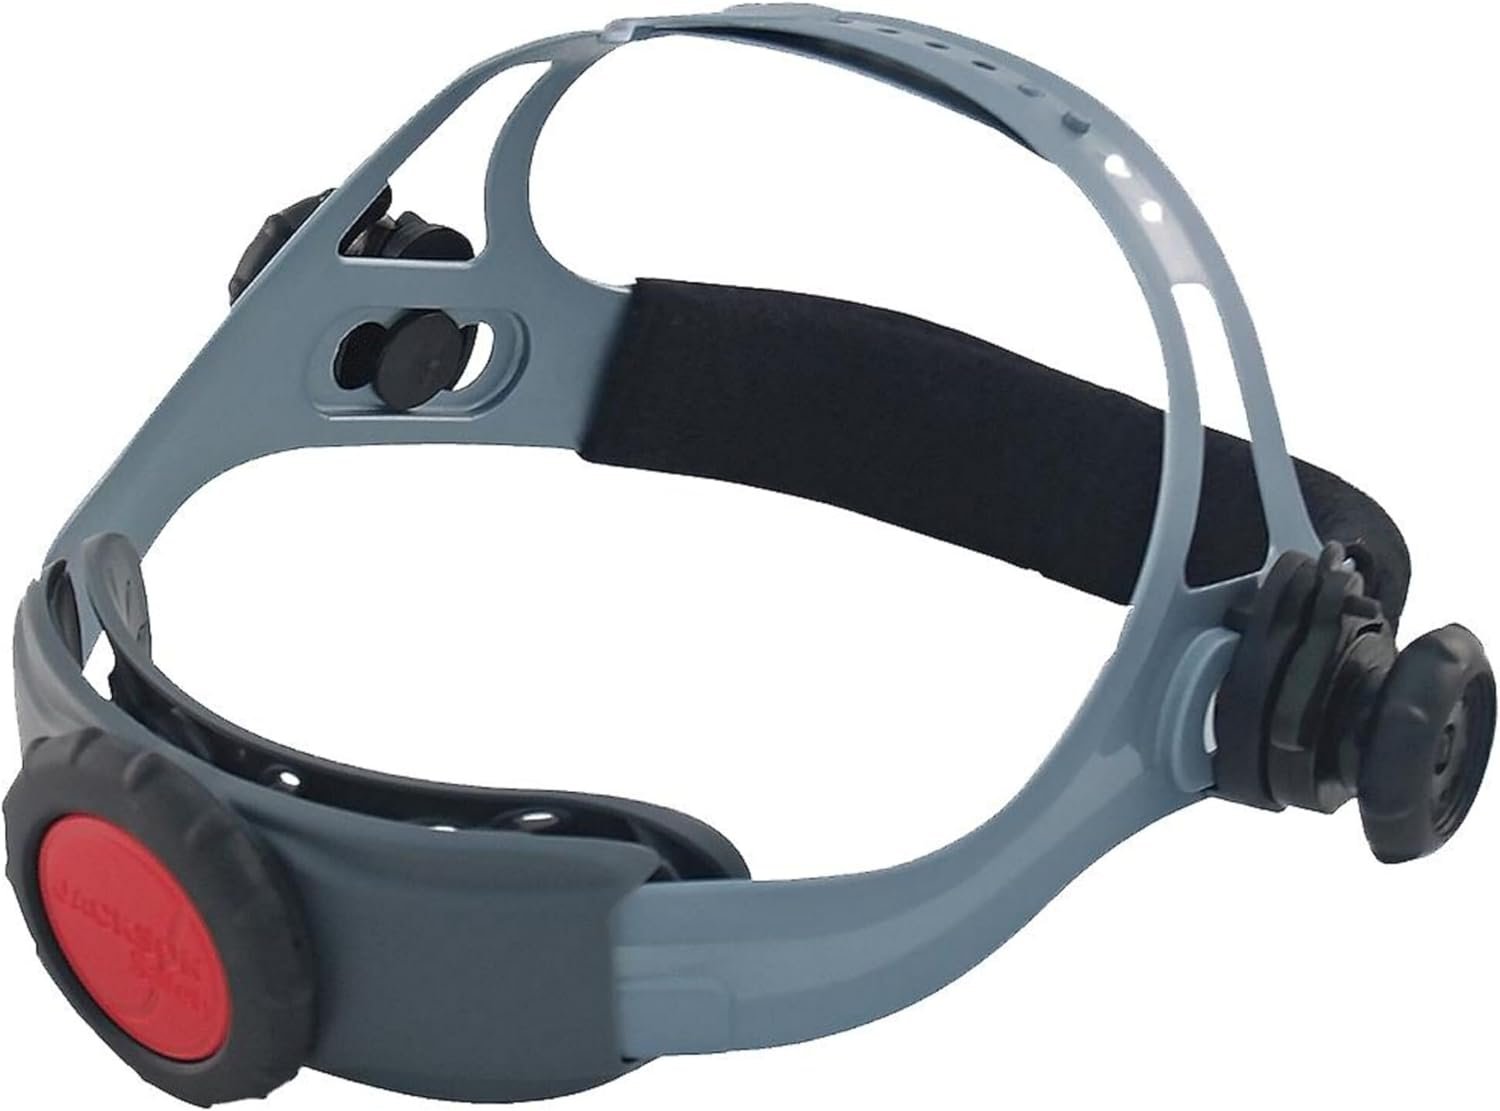
    The Jackson Safety 370 Speed Dial Replacement Ratcheting Headgear, product number 20696, is designed as a replacement suspension system for compatible Jackson Safety welding helmets. Rather than replacing an entire helmet, this type of component allows users to replace worn or damaged headgear while retaining a compatible helmet shell and lens assembly. Jackson Safety identifies the 20696 as its 370 Speed Dial Replacement Headgear and lists it as a U.S.-origin product.

    The design combines several adjustment points. A large ratcheting dial allows circumference adjustment, while a three-position slider changes the distance between the user’s eyes and the welding lens. A crown strap provides vertical positioning, and the helmet can lock into an elevated position when lifted. Jackson Safety also describes a lock-nut feature intended to help keep components together when the bracket is loosened.

    These details matter because welding is a task where the position of the helmet can affect the user’s ability to work comfortably and maintain a consistent view through the intended viewing area. A replacement headgear assembly therefore needs to be considered not simply as a comfort accessory, but as a component that must be properly matched to the helmet and correctly installed.

    This guide explains the Jackson Safety 370 Speed Dial Replacement Headgear, its main features, adjustment system, compatibility considerations, practical uses, maintenance considerations, and differences between replacement headgear and other welding helmet suspension categories.

    Key Features of the Jackson Safety 370 Speed Dial Headgear

    Replacement Suspension for Welding Helmets

    The Jackson Safety 370 Speed Dial is a replacement headgear assembly rather than a complete welding helmet.

    That distinction is important.

    The headgear provides the suspension and adjustment system that connects the helmet to the user’s head. It does not replace the welding lens, helmet shell, protective plates, or other components responsible for the helmet’s certified protective characteristics.

    Jackson Safety lists product number 20696 specifically as a 370 Speed Dial Replacement Headgear.

    When replacing a helmet suspension, users should therefore verify that the replacement is appropriate for their particular helmet model rather than assuming that all welding helmets use interchangeable headgear.

    Oversized Ratcheting Adjustment Dial

    One of the most recognizable characteristics of the 370 suspension is its large adjustment dial.

    Jackson Safety describes the dial as an oversized soft-rubber adjuster that is designed to be easy to locate and turn, including while wearing gloves.

    This is particularly relevant in welding environments because gloves are commonly worn as part of appropriate protective equipment.

    A small adjustment mechanism can be inconvenient when precise finger movement is difficult. A larger dial provides a more substantial surface for turning.

    The ratcheting system also allows incremental adjustment instead of requiring the user to make a large change at once.

    Fine-Tooth Ratcheting Mechanism

    The 370 Speed Dial uses a fine-tooth ratcheting mechanism.

    According to Jackson Safety, this mechanism is intended to provide more precise adjustment without excessive tightening.

    A ratcheting system works differently from a simple strap or friction adjustment. Instead of relying entirely on pulling a band to a particular position, the user rotates the dial to progressively change the headgear’s fit.

    This can be useful when the helmet needs a small adjustment after putting it on.

    Three-Position Lens-Distance Slider

    The headgear includes a three-position slider that adjusts the distance between the user’s eyes and the welding lens. Jackson Safety identifies this as one of the main adjustment features of the 370 system.

    This adjustment is separate from the circumference dial.

    The distinction is useful:

    • The ratchet changes how tightly the headgear fits around the head.
    • The slider changes the front-to-back relationship between the user’s eyes and the helmet.
    • The crown adjustment changes the vertical position of the helmet.

    Having several independent adjustment points gives users more control over the overall position of the helmet.

    Crown Strap Adjustment

    The crown strap allows the headgear to be raised or lowered on the user’s head.

    Jackson Safety describes the crown adjustment as a way to position the helmet vertically for comfort and performance.

    This can be especially relevant when the helmet feels too high or too low even though the circumference is correctly adjusted.

    For example, tightening the circumference does not necessarily solve a helmet that sits too low over the forehead. The crown adjustment addresses a different dimension of fit.

    Locking Up and Down Position

    The 370 design incorporates a locking mechanism that helps hold the helmet in an elevated position.

    Jackson Safety describes the headgear as locking into a detent when lifted and remaining in the upward position until manually lowered. The company also describes vertical lock-in as a way to reduce unwanted helmet movement or “creeping.”

    This is useful for the common workflow in which a welder raises the helmet to inspect a workpiece, prepare a joint, position equipment, or communicate with another person and then lowers the helmet before welding.

    The locking function is part of the mechanical suspension system and should not be confused with the protective function of the welding lens.

    Rear Swivel Headband Design

    The 370 system includes a rear headband designed to swivel upward and downward.

    Jackson Safety describes its patented quick-fit rear headband as part of the system’s adjustment architecture.

    A rear headband that can move vertically provides another way to accommodate the shape and position of the user’s head.

    This can also help when a helmet needs to be worn for extended periods, because proper adjustment is not necessarily about making the suspension as tight as possible. The objective is to achieve a secure, stable fit without unnecessary pressure.

    Sweatband

    The headgear incorporates a sweatband intended to absorb perspiration and help prevent sweat from interfering with vision. Jackson Safety lists replacement sweatbands for the 370 system separately, including product number 32187.

    Sweat management can be particularly relevant during welding because work environments may involve heat, protective clothing, physical effort, and extended periods of helmet use.

    The sweatband is a replaceable component, meaning the suspension does not necessarily need to be discarded simply because the band becomes worn or requires replacement.

    Users should follow the manufacturer’s cleaning and replacement guidance for the particular sweatband supplied with their headgear.

    Lock-Nut Feature

    Jackson Safety also identifies a lock-nut feature designed to help keep the headgear components together even when the bracket is loosened.

    This type of mechanical detail can be useful during adjustment and maintenance because it helps keep the assembly organized when components are being repositioned.

    As with any PPE component, users should inspect the hardware regularly and avoid using a suspension assembly if important parts are cracked, missing, excessively worn, or no longer secure.

    How the Jackson Safety 370 Headgear Can Be Used

    Replacing Worn Helmet Suspension

    One of the most straightforward applications is replacing an existing suspension that has become worn.

    Over time, a headgear assembly can experience repeated adjustment, perspiration, dust, impact, and general mechanical wear.

    A replacement suspension can provide a way to restore the helmet’s internal headgear without automatically replacing every other component.

    Before installing the replacement, users should identify the exact helmet model and confirm compatibility.

    Replacing Damaged Adjustment Components

    The ratcheting mechanism is one of the parts that receives repeated use.

    If the adjustment dial no longer functions correctly, the headgear has become damaged, or the suspension cannot maintain an appropriate fit, replacing the entire headgear assembly may be more practical than attempting to repair individual components that are not intended to be serviced.

    The correct approach depends on the helmet manufacturer’s replacement-part instructions.

    Maintaining a Consistent Helmet Position

    Once installed on a compatible helmet, the 370 suspension provides several adjustment points that can be configured around the user’s head.

    A sensible fitting process can include:

    1. Place the helmet on the head.
    2. Adjust the crown strap for the desired vertical position.
    3. Use the ratcheting dial to establish a secure circumference.
    4. Adjust the three-position slider if the helmet needs to sit closer to or farther from the face.
    5. Raise and lower the helmet to verify that the movement functions correctly.
    6. Confirm that the suspension and helmet remain securely connected.

    The exact procedure can vary according to the helmet model and manufacturer’s instructions.

    Supporting Work That Requires Frequent Helmet Movement

    Welding work can involve repeated transitions between welding and inspection or setup.

    The 370 headgear’s up-position locking mechanism is designed around that type of movement. Jackson Safety states that the suspension locks when lifted and stays in the upward position until manually lowered.

    This can make the helmet easier to reposition during tasks where the operator needs to inspect a joint or prepare the next welding operation.

    The helmet must still be lowered and correctly positioned before performing welding operations that require its protection.

    Understanding Compatibility

    Compatibility is one of the most important considerations when purchasing replacement headgear.

    Jackson Safety identifies product 20696 as the 370 Speed Dial replacement headgear and lists it for use with various Jackson Safety helmet families. Its U.S. product page describes the product as fitting most Jackson Safety welding helmets in the applicable 370 series, while Jackson Safety’s European product information identifies model 20696 for Graphic welding helmets and lists other 370 headgear part numbers for specific helmet families.

    Third-party product listings also identify compatibility with several Jackson Safety series, including Halo X, HSL, Nitro, WH40, and SmarTIGer.

    However, compatibility should be checked by exact helmet model and revision where possible.

    A similar-looking mounting system does not automatically mean that a replacement suspension is approved for every helmet.

    Why Exact Model Matching Matters

    Welding helmets are protective equipment.

    A replacement component should not be selected solely because the mounting holes appear similar.

    The suspension must attach securely and position the helmet correctly. If the replacement is not intended for a particular helmet, the resulting fit or mechanical connection may not be appropriate.

    For this reason, users should consult the helmet’s documentation, manufacturer’s replacement-part information, or an authorized supplier when there is uncertainty.

    Who the Jackson Safety 370 Replacement Headgear May Be Suitable For

    Welders With Worn Suspension Systems

    The product is primarily relevant to people who already own a compatible Jackson Safety welding helmet and need to replace its suspension.

    This can be more targeted than replacing an entire helmet when the shell, lens assembly, and other components remain suitable for continued use.

    Professional Welding Environments

    Professional welders may use their helmets frequently and therefore subject the suspension to regular adjustment and wear.

    A replacement headgear system can be relevant where maintaining a properly functioning suspension is part of routine PPE maintenance.

    Fabrication Shops

    Fabrication environments can involve repeated welding, grinding, positioning, and inspection.

    The ability to adjust the helmet without removing it and to lock the helmet in the raised position can be useful for this type of workflow.

    Maintenance and Repair Departments

    Industrial maintenance workers may use welding helmets alongside other forms of protective equipment.

    A replacement suspension can be useful for maintaining existing compatible helmets rather than treating every worn suspension as a reason to discard the entire assembly.

    Occasional Welders

    The product can also be relevant to people who weld less frequently if they own a compatible Jackson Safety helmet and the existing headgear has deteriorated.

    Even infrequent PPE should be inspected before use. Storage over long periods does not eliminate the need to check for damage, deterioration, or missing components.

    Important Things to Consider

    The Headgear Is Not the Welding Lens

    One of the most important distinctions is that the 370 Speed Dial is a headgear replacement, not a complete welding helmet.

    It does not provide the shade protection of a welding lens by itself.

    The protective performance of a welding helmet depends on the complete compatible assembly, including the shell, lens or auto-darkening filter, safety plates, and other applicable components.

    Users should therefore never assume that installing a new suspension automatically restores every aspect of a helmet’s protective condition.

    Inspect the Entire Helmet

    When replacing headgear, it is sensible to inspect the rest of the helmet at the same time.

    Check for:

    • Cracks in the shell
    • Damaged mounting points
    • Loose components
    • Scratched or damaged protective plates
    • Problems with the auto-darkening filter
    • Missing hardware
    • Damaged seals or gaskets where applicable
    • Excessive wear around attachment areas

    If another component is damaged or no longer meets the manufacturer’s requirements, replacing only the suspension may not be sufficient.

    Follow the Helmet Manufacturer’s Instructions

    Different welding helmets can have different assembly requirements.

    Even when a replacement headgear is designed for multiple models, the installation procedure can vary.

    The manufacturer’s instructions should take priority over generalized installation advice.

    If the helmet is used in a workplace subject to regulatory or employer requirements, the applicable workplace PPE procedures should also be followed.

    Do Not Modify the Headgear

    It may be tempting to drill new holes, cut straps, bend components, or otherwise modify a suspension to make it fit another helmet.

    This should be avoided unless the manufacturer explicitly provides an approved modification procedure.

    Protective equipment should remain within its intended configuration.

    Fit Should Be Secure Without Excessive Tightening

    A ratcheting dial makes it easy to tighten the headgear incrementally.

    That does not mean the dial should be tightened as far as possible.

    Jackson Safety specifically describes the fine-tooth ratcheting system as allowing a precise fit without overtightening.

    The goal is a stable fit that keeps the helmet positioned correctly without creating unnecessary pressure.

    Lens Distance Is a Separate Adjustment

    Users sometimes focus entirely on the circumference adjustment and overlook the three-position slider.

    If the helmet feels too close or too far from the eyes, tightening the rear dial may not solve the problem.

    The lens-distance slider is designed to address that front-to-back positioning.

    Replace Worn Sweatbands When Necessary

    Sweatbands are consumable components.

    Jackson Safety lists replacement sweatbands specifically for the 370/117A headgear family, demonstrating that the sweatband can be replaced separately.

    Replacing the sweatband can be a more targeted maintenance step than replacing the entire suspension when the rest of the headgear remains in suitable condition.

    Consider Helmet Weight

    Headgear affects how a helmet sits on the head, but it does not eliminate the weight of the helmet itself.

    A heavier helmet may require careful adjustment of the crown strap, circumference, and lens distance to achieve a comfortable and stable fit.

    The suspension can help distribute and position the helmet, but it cannot change the underlying weight of the helmet shell and attached components.

    Comparison With General Welding Helmet Suspension Categories

    Ratcheting Headgear vs. Traditional Adjustment Straps

    Traditional helmet suspensions may use basic strap adjustments that require manually repositioning the band.

    A ratcheting system uses a dial that allows incremental tightening and loosening.

    The Jackson Safety 370 uses a large ratcheting dial specifically designed for this purpose.

    For users who frequently adjust their helmets, this mechanism can provide a different fitting experience from a simple strap-based suspension.

    Replacement Headgear vs. Complete Welding Helmet

    A complete welding helmet includes the protective shell, viewing system, suspension, and other components.

    Replacement headgear addresses only the suspension system.

    This makes replacement headgear appropriate when the existing helmet remains compatible and otherwise serviceable, while a complete helmet may be necessary when the shell, lens, or other critical components are damaged or unsuitable.

    Multi-Adjustment Headgear vs. Basic Suspension

    A basic suspension may provide fewer adjustment points.

    The 370 system includes:

    • Circumference adjustment
    • Three-position lens-distance adjustment
    • Crown strap adjustment
    • Up/down locking functionality
    • Rear headband movement

    This creates a more configurable suspension architecture.

    Replacement Suspension vs. Replacement Sweatband

    A sweatband addresses perspiration management.

    A replacement headgear assembly addresses the larger suspension system.

    Because Jackson Safety offers replacement sweatbands separately, users can replace only the sweatband when appropriate rather than replacing the entire headgear assembly.

    The correct replacement depends on which component is actually worn or damaged.

    Practical Fitting Tips

    Start With the Crown Strap

    The crown strap determines how high or low the helmet sits.

    Adjusting it first can provide a better starting point before tightening the circumference.

    Adjust the Circumference Gradually

    Use the oversized dial to make small adjustments rather than immediately tightening the headgear significantly.

    A gradual approach makes it easier to find a stable position without unnecessary pressure.

    Check the Lens Position

    Use the three-position slider to adjust the relationship between the eyes and the lens.

    The appropriate setting depends on the helmet design, user’s face shape, and preferred working position.

    Test the Up-and-Down Movement

    Before beginning work, raise and lower the helmet to make sure the mechanism moves properly.

    The helmet should remain securely attached to the suspension and should not exhibit unexpected looseness.

    Check Hardware Regularly

    Repeated movement can eventually loosen or wear mechanical components.

    Routine inspection is especially important for PPE because a suspension problem can affect how the helmet sits during use.

    Cleaning and Maintenance Considerations

    The headgear is exposed to perspiration and the general environment of the workplace.

    Regular maintenance can help keep the suspension in usable condition.

    The sweatband deserves particular attention because it is the part most directly exposed to perspiration.

    When cleaning any part of the suspension, users should follow Jackson Safety’s instructions for the specific component. Avoid using cleaning chemicals that could degrade plastics, rubber, fabric, or other materials unless the manufacturer identifies them as appropriate.

    The headgear should also be allowed to dry appropriately after cleaning.

    If a sweatband becomes heavily worn, replacement may be preferable to attempting to restore it indefinitely.

    The adjustment mechanism should not be forced if it becomes difficult to operate. Resistance, cracking, broken components, or abnormal movement can indicate that the suspension needs inspection or replacement.

    Why Replacement Headgear Can Be Practical

    Replacing a component rather than an entire piece of equipment can make sense when the remaining equipment is still appropriate for use.

    For example, a welding helmet may have a serviceable shell and lens but an aging suspension.

    In that situation, a replacement headgear assembly can address the worn component directly.

    This approach also allows users to retain a helmet they are already familiar with, provided that the helmet remains within the manufacturer’s intended service condition and all protective components are suitable.

    However, replacement should never be used as a reason to keep a helmet that has suffered significant damage or whose protective components are no longer reliable.

    Frequently Asked Questions

    What is the Jackson Safety 370 Speed Dial Replacement Headgear?

    It is a replacement suspension system for compatible Jackson Safety welding helmets. The product number is 20696. Jackson Safety describes it as a 370 Speed Dial ratcheting headgear system.

    Does the headgear include the welding helmet?

    No. The 20696 is replacement headgear. The welding helmet shell and protective lens components are separate.

    What does the Speed Dial do?

    The large ratcheting dial adjusts the circumference of the headgear. Jackson Safety describes it as having a soft rubber grip and being designed for adjustment even when wearing gloves.

    Can the headgear be adjusted while wearing a helmet?

    The large rear dial is designed to allow size adjustment without removing the helmet.

    Does the headgear adjust the distance between the eyes and lens?

    Yes. It has a three-position slider designed to adjust the lens distance.

    Can the helmet be locked in the raised position?

    Yes. Jackson Safety describes a detent mechanism that holds the helmet in the upward position until it is manually lowered.

    Does the headgear include a sweatband?

    Yes. Jackson Safety lists a sweatband as part of the 370 headgear design and also offers replacement sweatbands separately.

    Is the sweatband replaceable?

    Yes. Jackson Safety lists replacement sweatband product number 32187 for the 370/117A headgear family.

    Is the Jackson Safety 370 headgear compatible with every welding helmet?

    No. Compatibility depends on the helmet model and suspension configuration.

    Jackson Safety lists product 20696 as a 370 replacement headgear and provides model-specific information for its helmet families. Third-party suppliers also list compatibility with several Jackson Safety models, but users should verify the exact helmet model before installation.

    Is the 20696 made in the United States?

    Jackson Safety’s current U.S. product page lists the country of origin for product 20696 as the United States.

    Does the headgear provide welding protection by itself?

    No. The headgear is the suspension component. Welding protection depends on the complete compatible helmet assembly, including the appropriate shell, lens/filter, safety plates, and other required components.

    Can the headgear be used with a damaged welding helmet?

    A replacement suspension should not be considered a way to make a significantly damaged helmet safe again. The entire helmet should be inspected, and damaged protective components should be addressed according to the manufacturer’s instructions.

    Why is the crown strap useful?

    The crown strap changes the vertical position of the helmet. This is separate from tightening or loosening the circumference around the head.

    What is the three-position slider used for?

    It changes the distance between the user’s eyes and the helmet’s viewing area. This allows another dimension of fit adjustment beyond the circumference dial.

    Is a ratcheting suspension different from a basic strap suspension?

    Yes. A ratcheting suspension uses a dial and incremental mechanism to adjust the circumference, while simpler suspensions may rely more heavily on manual strap positioning.

    Can the headgear be used by professional welders?

    It is designed as a replacement suspension for compatible Jackson Safety welding helmets and can therefore be relevant to professional welding environments where those helmets are used. Proper compatibility, installation, inspection, and workplace PPE requirements remain important.

    Conclusion

    The Jackson Safety 370 Speed Dial Replacement Ratcheting Headgear, product 20696, is designed to address the suspension portion of compatible Jackson Safety welding helmets. Its combination of a large ratcheting adjustment dial, three-position lens-distance slider, crown strap, up-position locking mechanism, rear headband movement, and sweatband provides several adjustment points for positioning a welding helmet.

    Its role is primarily maintenance and replacement. When a compatible helmet’s suspension becomes worn or damaged while the rest of the helmet remains suitable for service, a replacement headgear assembly can provide a targeted way to address that component.

    Compatibility should remain one of the first considerations. Jackson Safety provides model-specific information for the 370 series, and third-party suppliers identify several compatible Jackson Safety helmet families. Checking the exact helmet model before installation is therefore more reliable than assuming that the 20696 will fit every welding helmet.

    The adjustment system is also worth understanding. The rear ratcheting dial controls circumference, the three-position slider changes lens distance, and the crown strap affects vertical positioning. Together, these mechanisms allow the user to configure the suspension across several dimensions rather than relying on a single adjustment.

    At the same time, the headgear should be viewed as one component of a welding PPE system. It does not replace the protective function of the welding lens, shell, safety plates, or other required components. Regular inspection of the complete helmet remains important, particularly in demanding work environments.

    For welders, fabricators, maintenance personnel, and other users of compatible Jackson Safety helmets, understanding how the 370 Speed Dial suspension works can make replacement and routine maintenance decisions more straightforward.

    You can check more details on Amazon here.

    As an Amazon Associate, we earn from qualifying purchases.